Settings
The Settings section represents the platform's administrative and customization control center, designed to provide users with granular control over account settings, team management, process automation, and user experience customization. This comprehensive tool allows administrators and agents to configure, optimize, and customize all operational aspects of the platform.
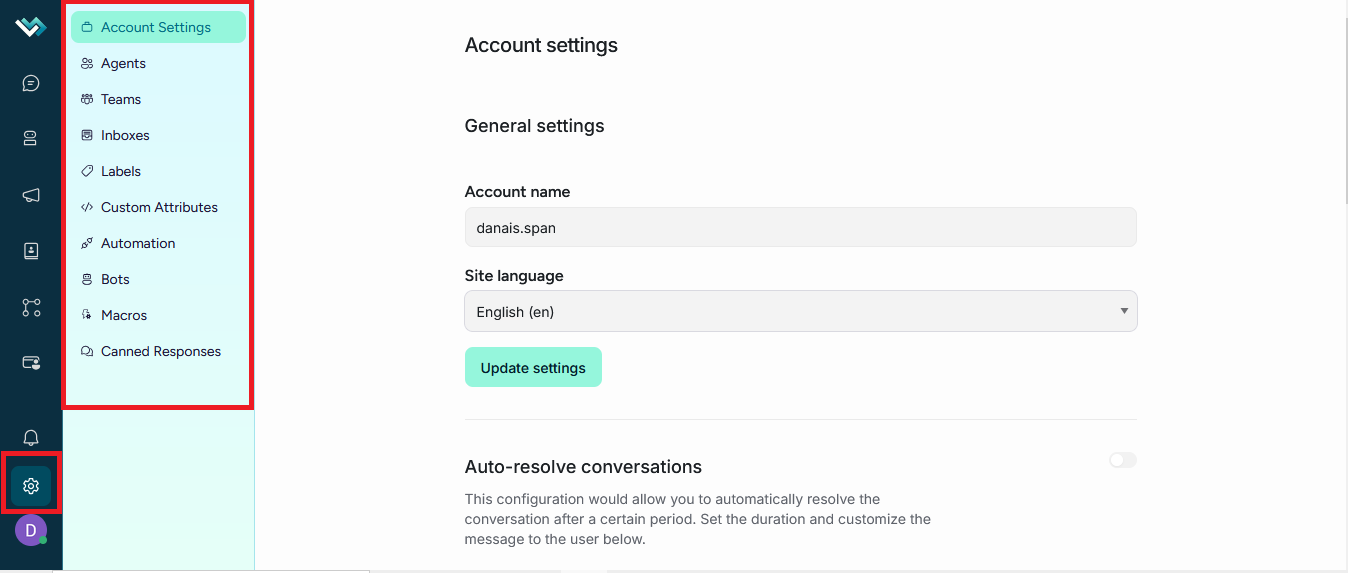
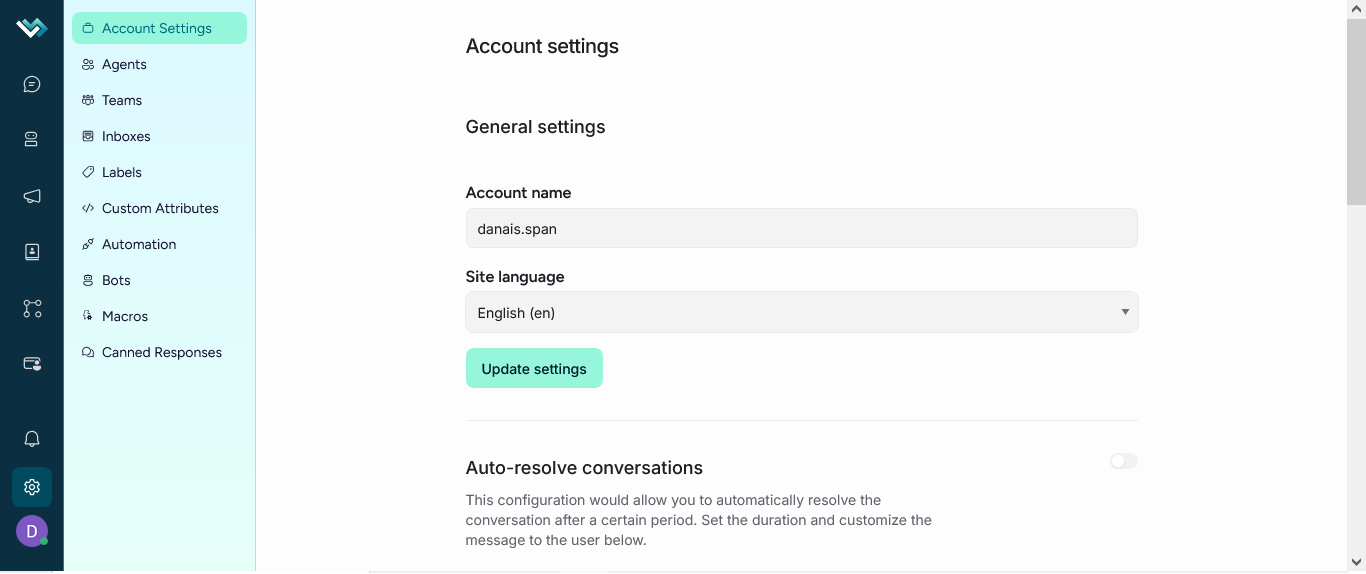
Account settings
The Account Settings section in LBdesk represents the platform's main administrative control center, designed exclusively for administrators to manage the organization's core aspects. This comprehensive tool allows you to configure account identities, set global operational parameters, manage enabled features, and control automated processes critical to the efficient operation of the system.
Main structure
The interface is organized in a vertical form layout with clearly defined sections:
├── Account name
├── Language selector. Immediate change of interface language
├── Idle duration for resolution
├──├── Custom resolution message. Sent to the client when the issue is automatically resolved.
├── Required for API-based integrations
├──├── Account ID
├──├── Access key
Agents
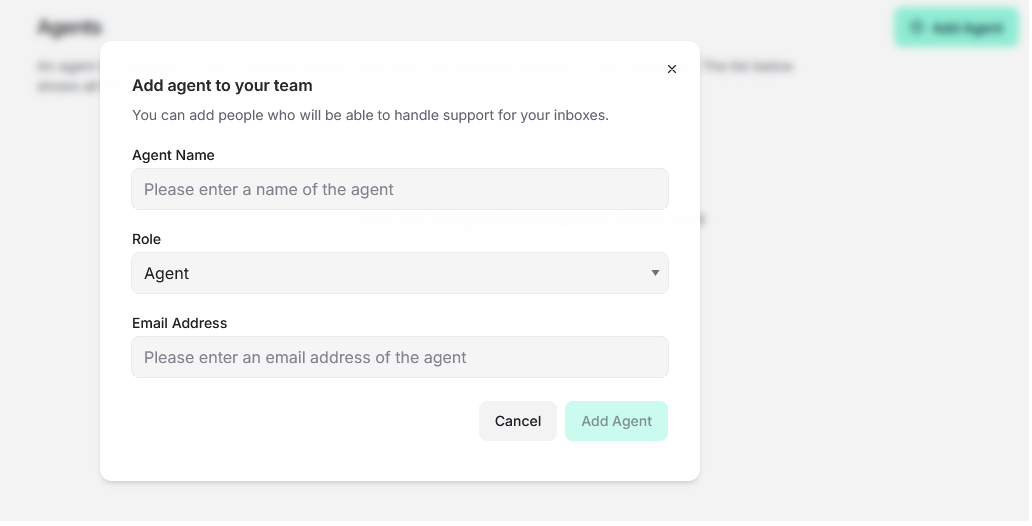
The Agent Settings section represents the control center for managing your customer service team, designed exclusively for administrators to manage, configure, and monitor all team members. This comprehensive tool allows for the creation, editing, deletion, and monitoring of agents, providing granular control over roles, permissions, availability, and plan limits.
├──Add Agent
├──Form Modal: Fill in Agent Details
├──├──Send: Create the agent in the system
├──├──Confirmation: Success Notification
├──├──Invitation: Automatic invitation sent via email
├──List of all agents on the account
├──├──Agent's Full Name
├──├──Agent's Contact Email
├──├──Status: Verified/Pending
├──├──Actions: Edit/Delete Buttons
Predefined roles
Administrator
- Access: Full system control
- Permissions: Agent management, configuration, reports
- Restrictions: Cannot delete self
Agent
- Access: Limited to assigned conversations
- Permissions: Reply to messages, manage conversations
- Restrictions: Cannot access settings
Agent limit control
Limits by plan:
- Free Plan: Specific agent limit
- Paid Plans: Increased or unlimited limits
- Enterprise Plan: Unlimited agents
Visual limit indicators:
- Unlimited status: No agent restrictions
- Limit reached: Plan update button
- Available limit: Remaining agent counter
- Informational messages: Alerts about limits reached
Update plan button:
- Condition: Appears when the agent limit is reached
- Label: Update Plan
- Functionality: Opens subscription modal
- Style: Main button with brand color

Teams
The Team Settings section represents the control center for organizing and managing work teams, designed exclusively for administrators to create, configure, and monitor specialized agent groups. This comprehensive tool allows for strategic staff segmentation, facilitating collaboration, assigning responsibilities, and optimizing team-based workflows.
Teams allow agents to be organized into groups based on their responsibilities. An agent can belong to multiple teams. When working collaboratively, conversations can be assigned to specific teams.
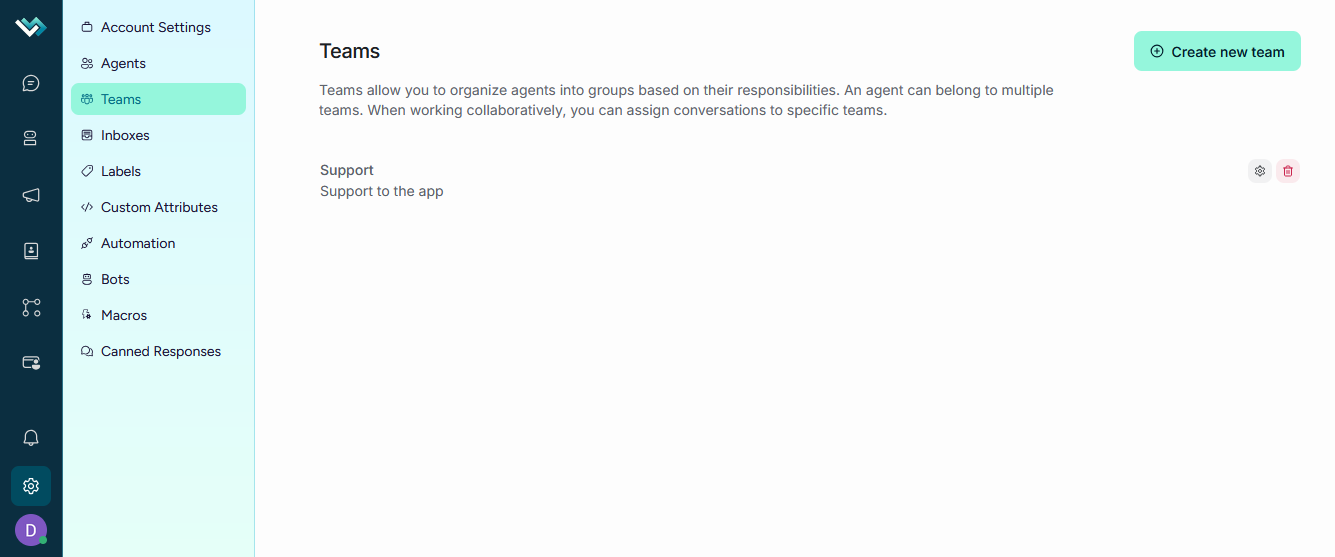
Access control
• Administrators only: Only users with administrator roles can access this feature.
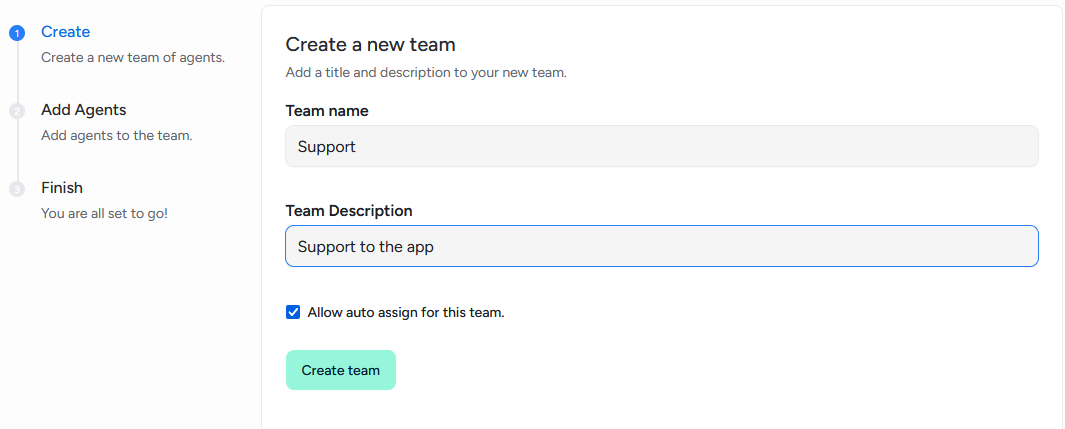
Team Creation/Editing flow (3-Step Wizard)
├──Step 1: Create a Team
├──├──Form Interface:
├──├─├──Form Fields:
- Team name: Required field with the placeholder "Example: Sales, Customer Support"
- Team description: Optional field with the placeholder "Short description about this team."
- Auto assignment: Check the "Allow auto assign for this team" box to enable automatic conversation assignment
- Real-time validation: Instant validation with clear error messages
- Action button: "Create team" with loading status during processing
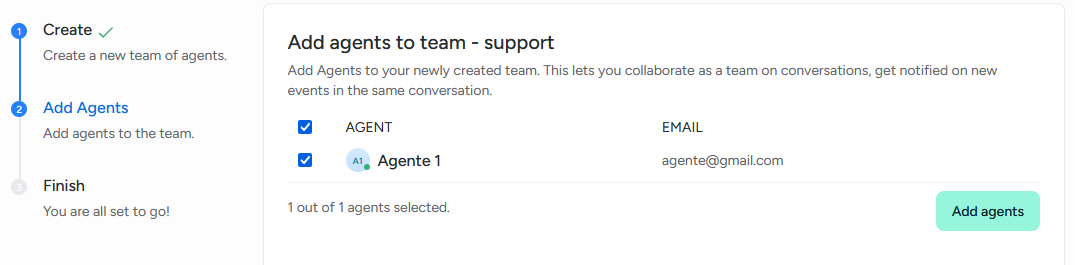
├──Step 2: Add Agents
├──├──Agent Selection Interface:
- Dynamic title: "Add agents to team - teamName"
- Description: "Add agents to your newly created team. This lets you collaborate as a team on conversations and get notified of new events in the same conversation."
- Agent Selector:
- Full list: Displays all available agents in the account
- Multiple selection: Allows you to select multiple agents simultaneously
- Bulk selection: "Select all agents" option for quick selection
- Dynamic counter: Displays "selected out of total agents selected."
- Validation: Requires selecting at least one agent
- Action button: "Add agents" with selection validation
├──Step 3: Finish setup
├──├──Confirmation screen:
- Title: "Your team is ready!"
- Message: "You can now collaborate as a team on conversations. Happy supporting"
- Action button: "Finish" to complete the process

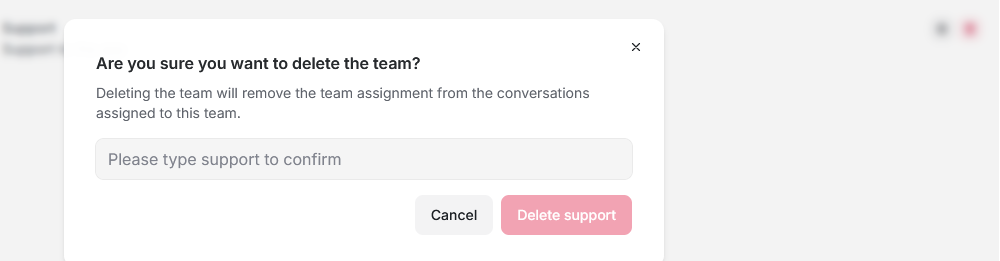
Team deletion
Secure deletion process:
- Mandatory confirmation: Double-check confirmation mode
- Warning message: "Deleting the team will remove the team assignment from the conversations assigned to this team."
- Name verification: Requires typing the exact team name to confirm
- Placeholder: "Please type teamName to confirm"
- Action buttons: "Delete teamName" and "Cancel"
- Loading states: Visual indicators during the deletion process
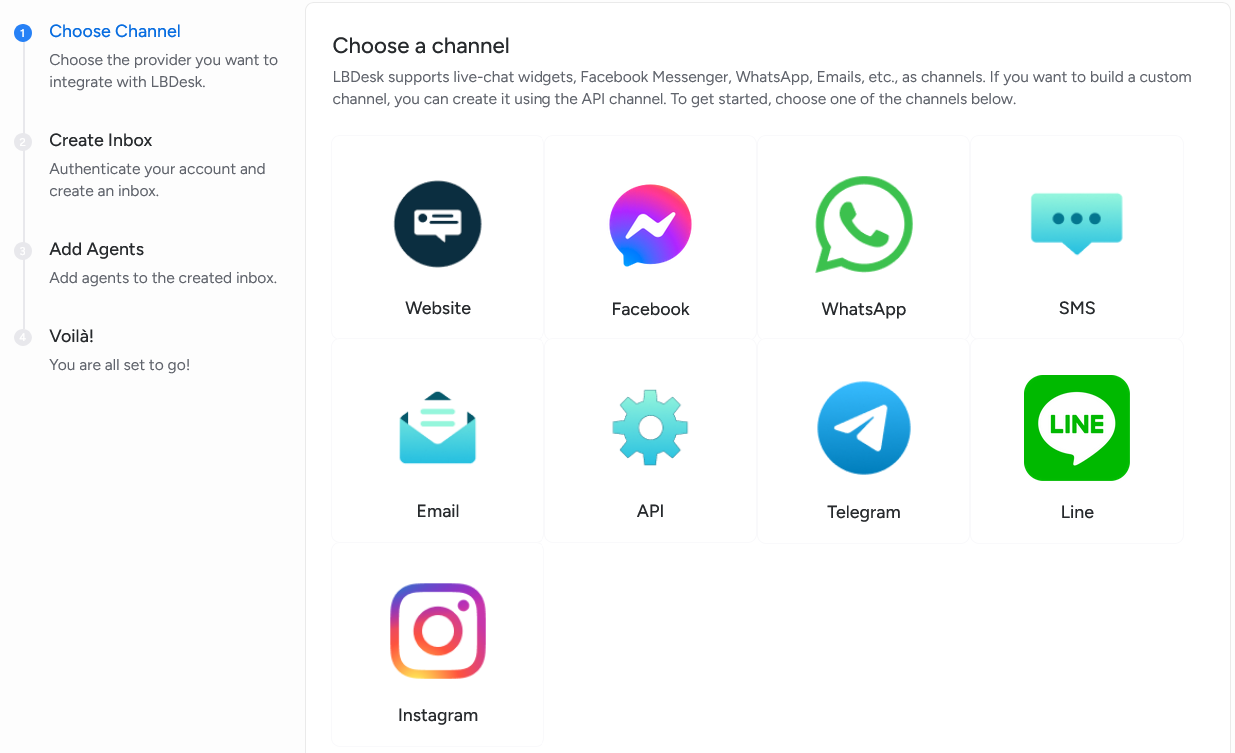
Inboxes
It represents the control center for comprehensive communication channel management, designed for administrators to create, configure, and monitor all customer touchpoints. This comprehensive tool enables omnichannel communications management, providing a unified customer service experience across multiple channels.
The channel is the communication mode the customer chooses to interact with. An inbox is where interactions for a specific channel are managed. It can include communications from various sources such as email, live chat, and social media.
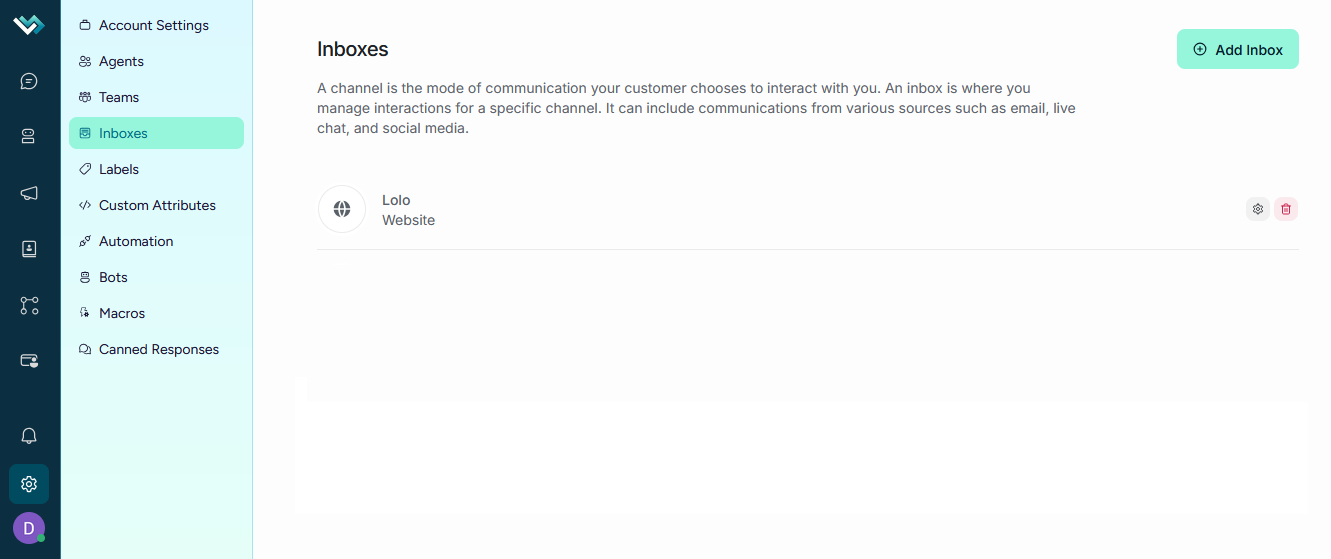
Available channel types
→ 1. Webchat
- Purpose: Live chat for websites
- Settings: Domain, welcome message, business hours
- Features: Customizable widget, pre-chat form, CSAT surveys
→ 2. Email
- Purpose: Email support
- Settings: Email address, IMAP/SMTP server
- Restriction: Only available on paid plans
→ 3. WhatsApp
- Purpose: WhatsApp support
- Providers: WhatsApp Cloud, Twilio
- Settings: Phone number, webhook, authentication
→ 4. Facebook
- Purpose: Facebook messaging
- Settings: Facebook page, access tokens
- Features: Instagram integration
→ 5. Instagram
- Purpose: Instagram direct messaging
- Settings: Instagram profile, authentication
- Migration: Support for migrating existing accounts
→ 6. SMS
- Purpose: Text messaging
- Settings: Phone number, SMS provider
- Webhook: Callback URL for incoming messages
→ 7. API
- Purpose: API integration
- Configuration: Webhook URL, HMAC authentication
- Use: Custom integrations
→ 8. Telegram
- Purpose: Telegram bot
- Configuration: Bot token, webhook
→ 9. LINE
- Purpose: LINE messaging
- Configuration: Channel ID, Channel Secret
Ticket creation process
-
Channel Selection: Modal with available options
-
Basic Configuration: Name, description, avatar
-
Specific Configuration: Parameters for the selected channel
-
Authentication: Service connection process
-
Agent Assignment: Collaborator selection
-
Advanced Configuration: Schedules, CSAT, forms
Plan restrictions
- Free plan: Webchat only available
- Paid plans: Full access to all channels
- Limits: Maximum number of posts per plan
Editing existing posts
Access settings
- Settings button: On each post in the list
- Tab navigation: Access all settings
- Auto save: Changes saved automatically
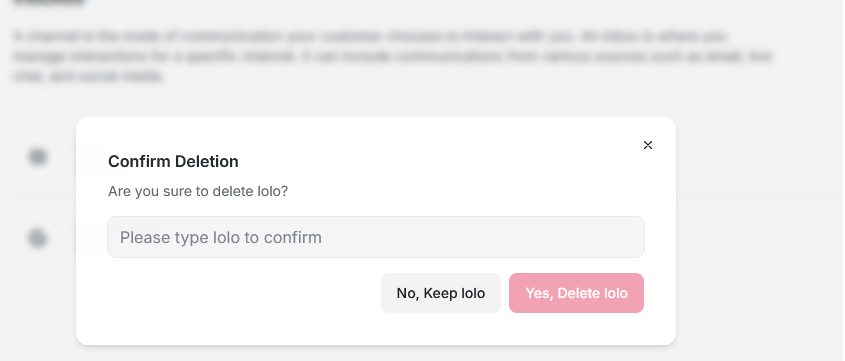
Deleting Posts
Deletion process
-
Confirmation: Confirmation modal with the post name
-
Validation: Verification that there are no active conversations
-
Deletion: Irreversible deletion process
-
Notification: Confirmation of successful deletion
Tabbed configuration system
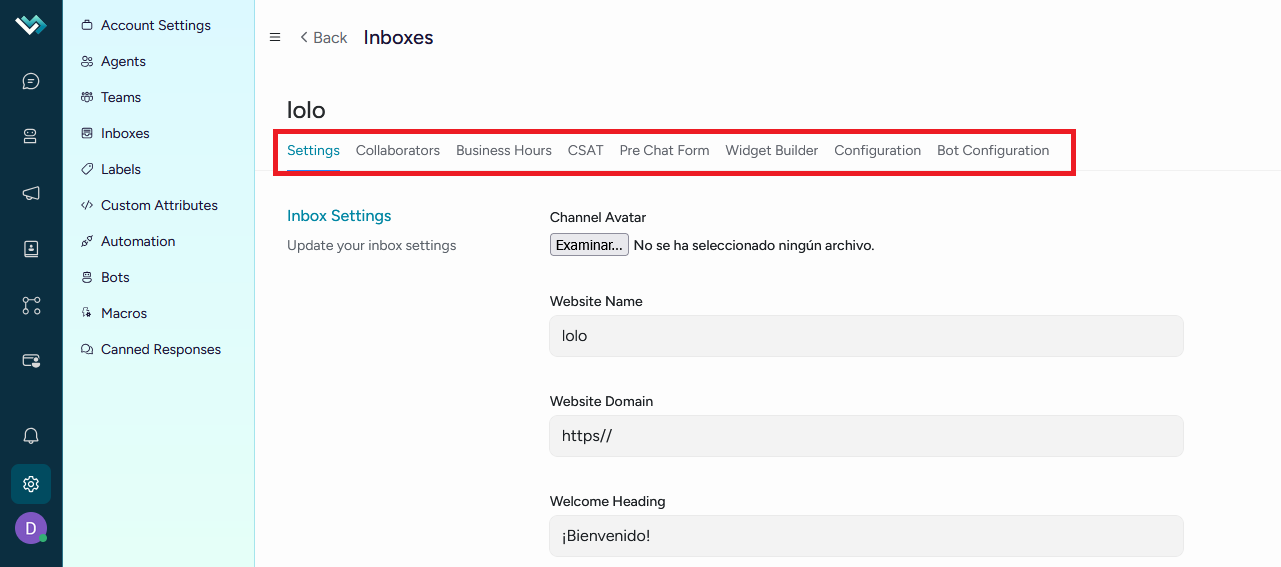
1. General configuration tab
Basic settings for the selected post:
Basic Information
- Post name: Unique identifier
- Avatar: Image representing the channel
- Description: Additional channel information
Channel-Specific Settings
- Webchat: Domain, welcome message, response time
- Email: Server, port, authentication
- WhatsApp: Phone number, provider, webhook
- Social networks: Access tokens, connected pages
Widget Features (Webchat only)
- File selector: Enable/Disable
- Emoji selector: Enable/Disable
- End conversation: Allow users to end conversations
- Bot avatar: Use the post's avatar
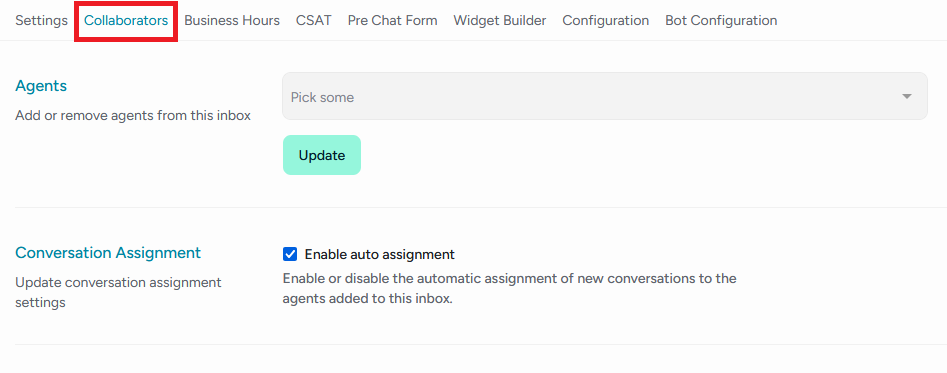
2. Collaborators tab
Management of agents assigned to the entry:
Agent list
- Tabular View: Name, email, role, status
- Filters: By role, availability status
- Search: By name or email
Management of assignments
- Add agents: Multi-select modal
- Remove agents: Confirm deletion
- Change roles: Assign specific permissions
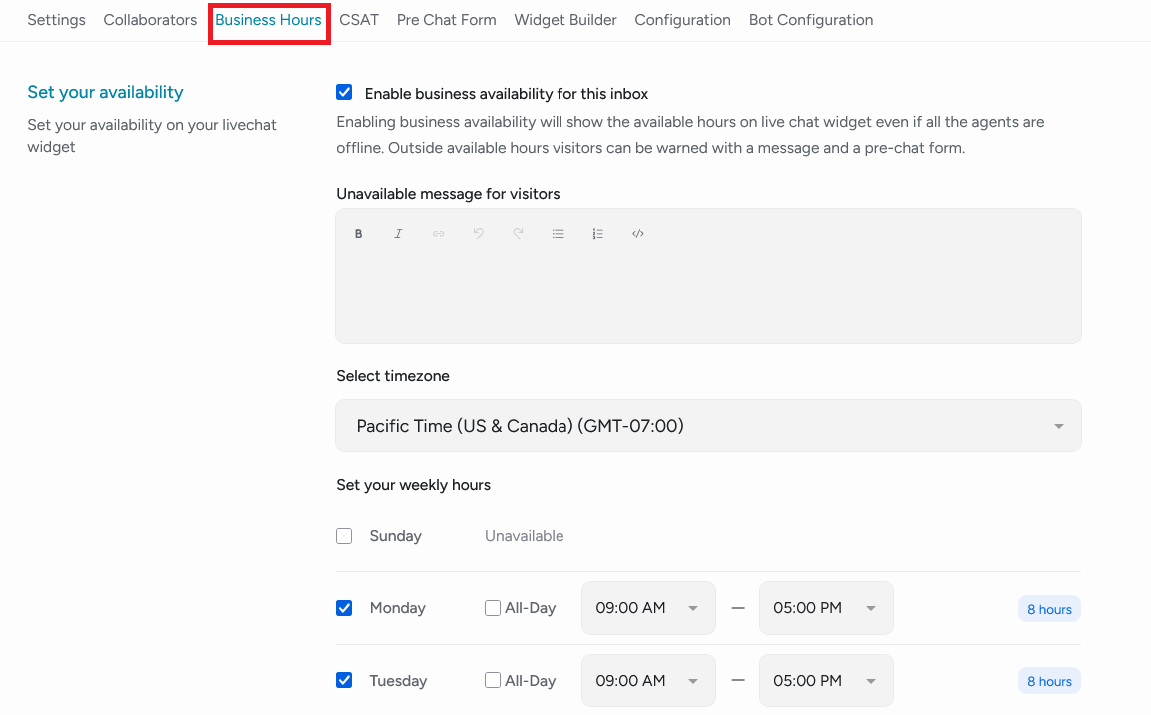
3. Business hours tab
Channel availability settings:
Weekly settings
- Days of the week: Monday to Sunday
- Hours: Start and end times per day
- Time zone: Regional settings
- Holidays: Special exceptions
After-hours messages
- Custom message: Text for after-hours messages
- Redirect: Alternate email or phone number
- Special hours: Seasonal settings
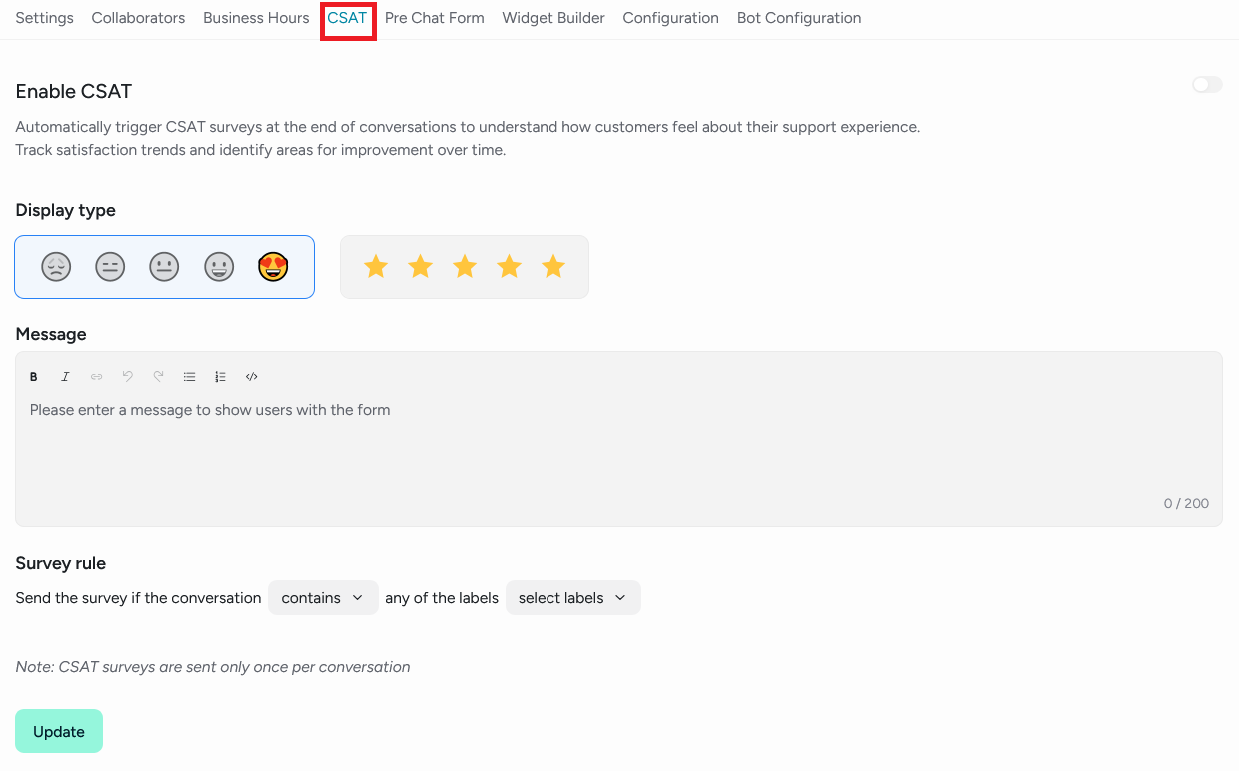
4. CSAT Tab (Webchat Only)
Satisfaction survey settings:
Survey settings
- Enable CSAT: Turn surveys on/off
- Survey timing: At the end of the conversation
- Rating scale: 1-5 stars or 1-10 points
Custom messages
- Survey question: Customizable text
- Thank you message: Sending confirmation
- Follow-up: Optional follow-up email
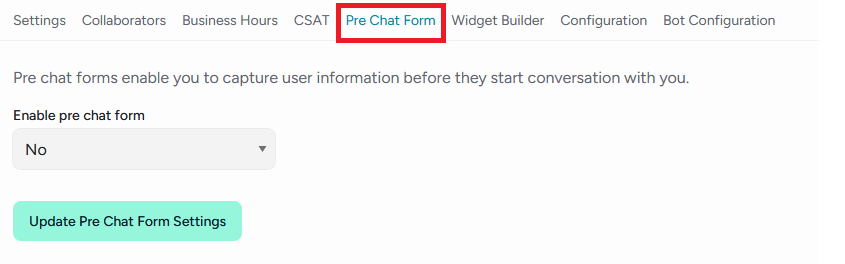
5. Chat pre-form tab (Webchat Only)
Pre-chat form settings:
Form fields
- Name: Required/Optional
- Email: Required/Optional
- Phone: Required/Optional
- Company: Required/Optional
- Initial message: Required/Optional
Validation and restrictions
- Required Fields: Configuration per field
- Email Validation: Correct format
- Character Limit: For text fields
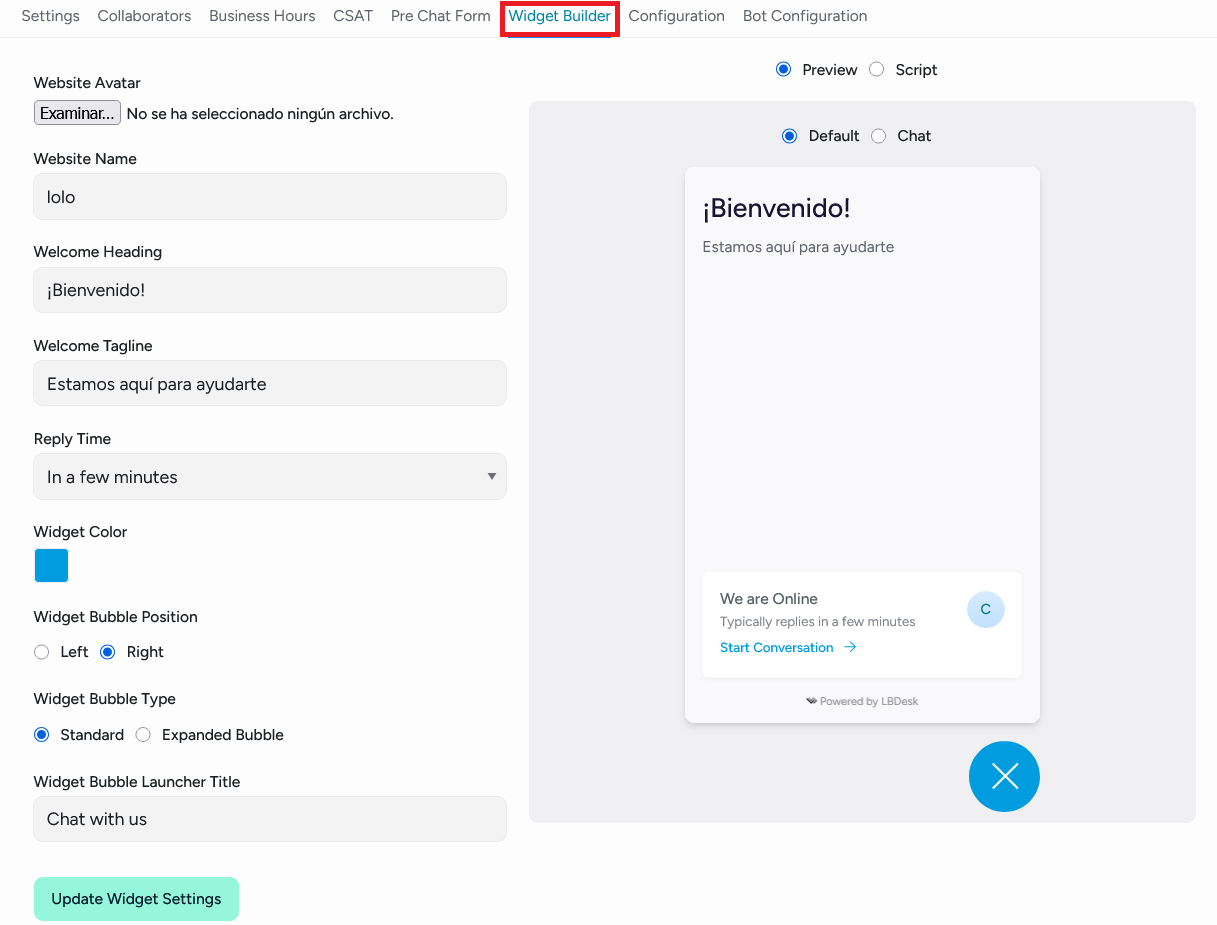
6. Widget builder tab (Webchat Only)
Visual widget customization:
Appearance settings
- Primary color: The widget's main color
- Secondary color: Accent color
- Position: Bottom right/left corner
- Size: Widget dimensions
Behavior settings
- Entry animation: Visual effects
- Notification sound: Audible alerts
- Auto-open: Open automatically under certain conditions
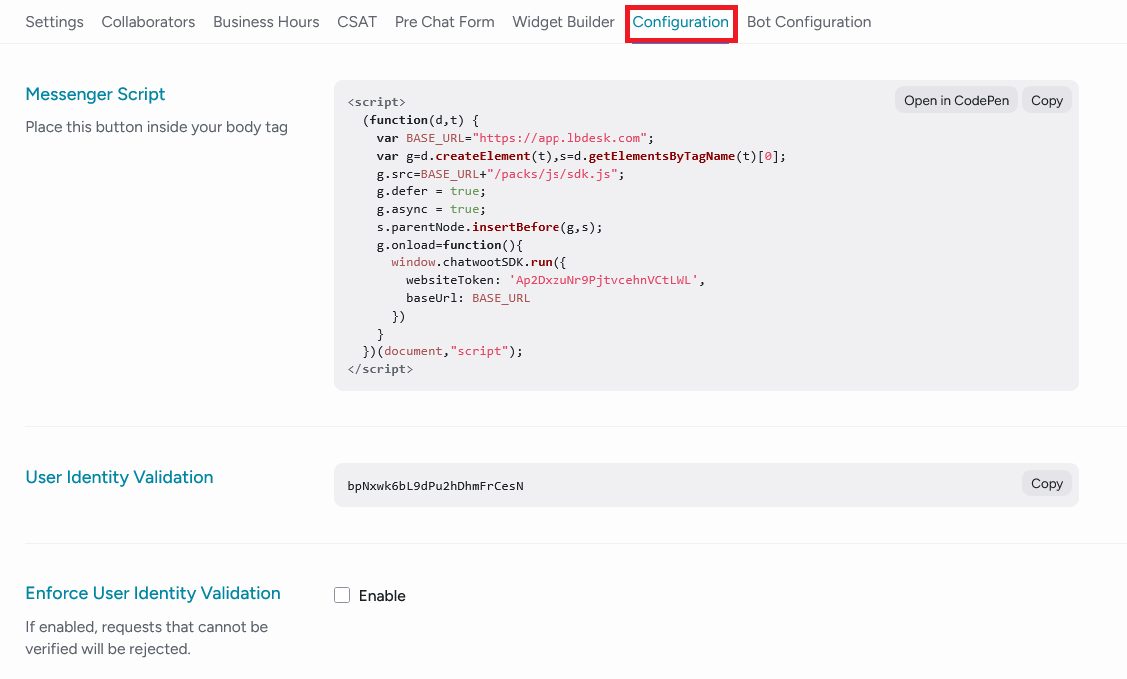
7. Configuration
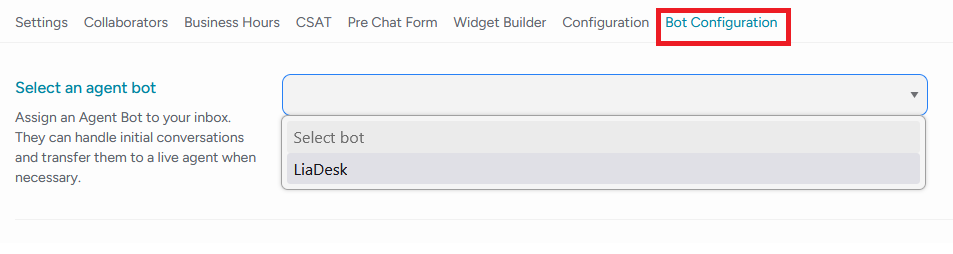
8. Bot settings tab (Specific Channel)
Automation settings:
Chatbot
- Enable bot: Toggle
- Bot type: Dialogflow, Custom Bot
- Response settings: Automatic Responses
LiaDesk integration
- Automatic escalation: Rule Settings
- Knowledge base: Data Sources
- Escalation thresholds: Transfer Criteria
Tags
It represents the control center for categorizing and organizing conversations and contacts, designed for administrators to create, manage, and customize an efficient tagging system. This comprehensive tool allows them to establish an organizational taxonomy that facilitates the classification, prioritization, and filtering of communications, significantly improving the team's operational efficiency.
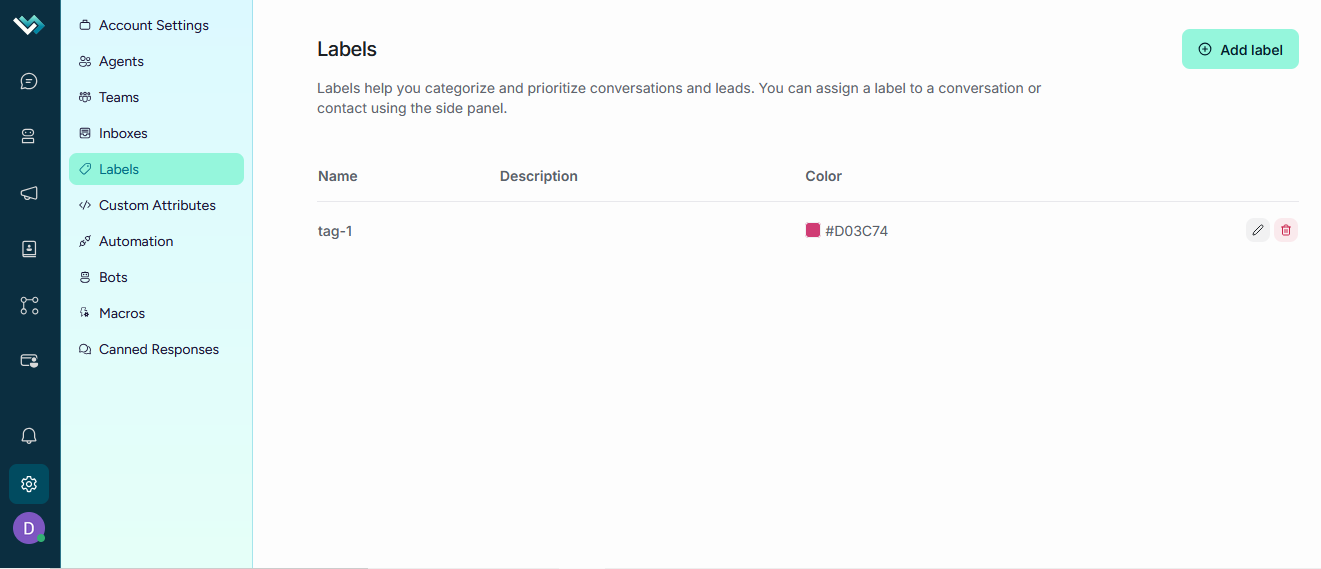
The interface is structured in a tabular list design that provides a complete and organized view of all existing tags, facilitating bulk management and quick identification of specific elements.
├── Header
│ ├── Action Button: “Add Tag”
├── Viewing Existing Tags
│ ├── Structured Table
│ │ ├── Name
│ │ ├── Description (Provides context on the tag's use)
│ │ ├── Color (Quick visual identification of the tag)
│ │ ├── Action Buttons
│ │ │├── Edit
│ │ │└── Delete
Label Creation/Editing system
├── Create/Edit Modal
│ ├── Form Fields
│ │ ├── Label Name Field (Required, Only letters, numbers, hyphens, and underscores)
│ │ ├── Description Field
│ │ ├── Color Picker
│ │ ├── Display in Sidebar Checkbox (Controls whether the label appears in the sidebar for quick filtering)
│ │ ├── Action Buttons
│ │ │├── Create/Edit
│ │ │└── Cancel

Deletion process
├── Confirmation: Confirmation modal before deleting
│ ├── Message: "Are you sure you want to delete [tag name]?"
│ ├── Action Buttons
│ │ ├── Cancel
│ │ ├── Delete
│ ├── Loading Indicator: Spinner during the deletion process
│ ├── Notifications: Success or error messages after the operation
Use Case: Conversation prioritization
Scenario: An e-commerce with different levels of urgency
1. Priority labels:

- Urgent (red) - Critical issues requiring immediate attention
- High (orange) - Important inquiries
- Medium (yellow) - Normal inquiries
- Low (green) - Low-priority inquiries

2. Labeling process:

- The agent assesses the urgency of the issue
- Applies the corresponding priority label
- The system can sort conversations by priority

3. Automation:

- Automatic rules based on keywords
- Automatic assignment to agents based on priority
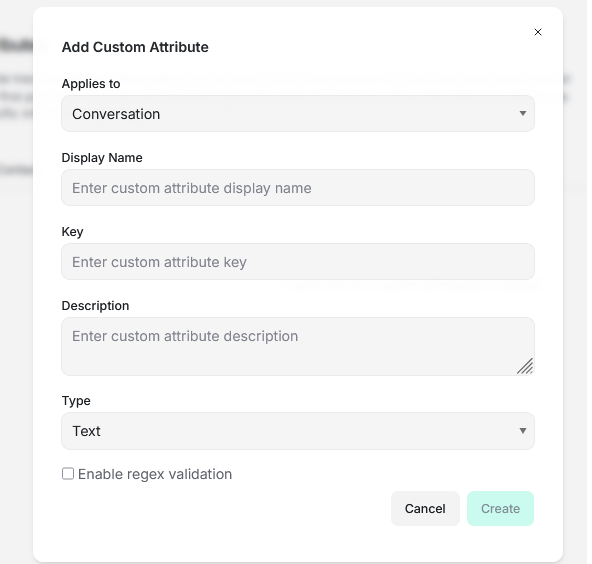
Custom attributes
It represents the control center for personalizing and extending the platform's data, designed to create, manage, and configure additional data fields that capture organization-specific information. This comprehensive tool allows you to define custom attributes for both conversations and contacts, providing complete flexibility in managing business information.
A custom attribute tracks additional details about your contacts or conversations, such as their subscription plan or the date of their first purchase.
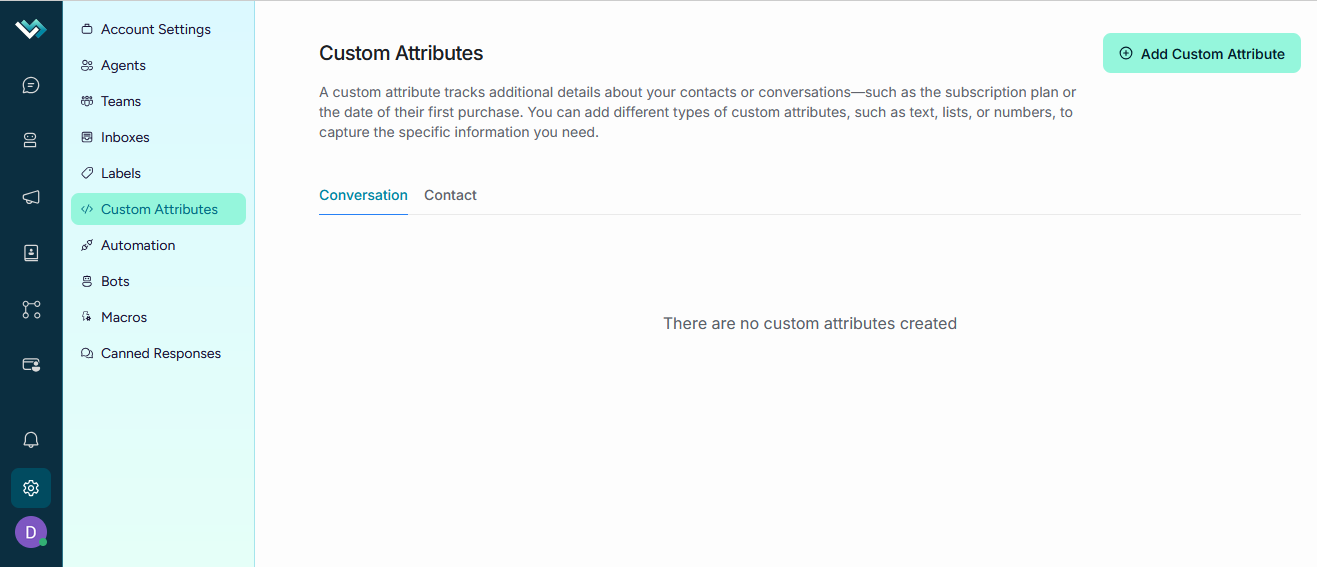
The interface is structured in a tabbed layout that clearly separates attributes by application context, providing an organized and efficient experience for managing different types of data.
├── Header
│ ├── Action Button: “Add Custom Attribute”
├── Contextual Tab System
│ ├── Conversations Tab: Manages attributes specific to the conversational context
│ ├── Contacts Tab: Manages attributes related to customer information
│ │ ├── Tab Structure
│ │ │├── Name
│ │ │├── Description
│ │ │├── Type
│ │ │├── Key
│ │ ├── Action Buttons
│ │ │├── Edit
│ │ │├── Delete
Creating/Editing custom attributes
Basic configuration fields:
- Display name: Required field that defines how the attribute is displayed in the interface
- Description: Free-text field to document the attribute's purpose
- Application: Selector that determines whether the attribute applies to conversations or contacts
- Attribute key: Auto-generated unique identifier based on the name
Advanced data type system:
- Text: For free-text information with optional regex validation
- Number: For numeric values with automatic validation
- Link: For URLs with format validation
- Date: For dates with a calendar selector
- List: For predefined options with multiple values
- Checkbox: For Boolean values (true/false)
Advanced validation configuration:
- Regex validation: Optional system for custom validation patterns
- Regex hint: Helper field to guide users on the expected format
- Conditional enable: Enabling regex validation only for text fields
List of values management
Intelligent Multi-Select System
For list-type attributes, the system provides:
- Value entry: Input field with auto-completion
- Minimum validation: Requires at least one value for lists
- Dynamic management: Add and remove values in real time
- Taggable interface: Create new values using the keyboard
Action buttons:
- Create/Edit
- Delete
Use Case: E-commerce - Order Tracking
Scenario: An online store that needs to track specific information for each query.
1. Conversation attributes:

- order_number (text) - Order number
- order_status (list) - Status: ["pending", "shipped", "delivered", "cancelled"]
- order_value (currency) - Order value
- shipping_method (list) - Shipping method: ["standard", "express", "free"]
- priority_level (list) - Priority: ["low", "medium", "high", "urgent"]

2. Contact attributes:

- customer_tier (list) - Level: ["bronze", "silver", "gold", "platinum"]
- total_orders (number) - Total orders placed
- last_purchase_date (date) - Date of last purchase
- preferred_language (list) - Preferred language
- is_vip (checkbox) - VIP customer

Workflow:

1. Customer starts conversation with customer number Order

2. Agent applies conversation attributes based on the query

3. System automatically updates contact attributes

4. Intelligent filtering by order status, value, and priority

5. Automatic escalation based on customer level